
How To Attach Wheels To A Chicken Tractor – A Simple Solution
Fed up with watching your chickens play around in the same worn out space? Whether you own a stationary coop but want it to be mobile, or are planning to build a mobile coop, wheels make it happen! In this article, we’ll show you how to attach wheels to a chicken tractor.
Is this a complicated job? Nope, not really. There are more complicated ways of adding wheels that can be adjusted up or down which are great. But if you’re looking for something simpler, you’ve come to the right place!
Why Use Coop Wheels?
If you have a particular spot in the yard where your coop just HAS to be, that’s great. You probably won’t need wheels on it since you’ve already planned out it’s positioning. But we’ll take a look at a few reasons why wheels can be a great addition to any coop.
Mobility
It goes without saying that wheels can make your coop mobile…duh! But what are other variables to consider? Below is a look at the advantages and disadvantages of having a mobile coop.
PROS
Good for your chickens – Moving the coop around to different areas of the yard or pastures is good for them. New bugs, grass, seeds, and scenery keeps them happy
Good for your grass – Your lawn or pasture will get daily or weekly (depending on how often you move the coop) fertilizer on it.
Inspect your flock – While moving your coop, you’ll have a chance to examine your chickens, looking for any health issues.
Flexibility – If you’d prefer having a stationary coop placement somewhere in your yard, but aren’t sure where, being able to move your coop around is helpful for finding just the right spot.
Also, just because you have wheels on the coop, doesn’t mean you HAVE to move it. It can remain stationary!
CONS
Extra Work – Depending on how often you move it, be it daily, weekly, bi-weekly, etc., you’ll have to go through the effort of physically lifting and moving it.
Poop on the lawn – Although the grass gets fertilized, the “side effect” is the poop! A double edged sword I suppose. Consider avoiding the area where the coop just moved from, at least for a few days.
Aesthetics – Some people don’t like the look of wheels on the coop and prefer the stand alone look. To each his own! It’s a matter of personal preference.
Types of Wheels
There are MANY wheel options that can be used for your coop or run. We discuss many of them in this article. But we’ll list a few of the most common types of wheels used for chicken tractors here.

Pneumatic Tires
These are a very common type of wheel. It’s the type of wheel that is hollow inside and needs to be aired up. They can have tubes or simply be tubeless.

Solid Rubber Flat Free Tires
These tires contain solid rubber all the way through. No airing up tires! Although they cost more than pneumatic, they are nearly maintenance free once installed.
It’s a favorite type of wheel we use for lawn mowers, hand trucks, wheel barrows, and the like.

Bike Tires
We’ve seen bike tires on chicken coops too! These are easy to find at thrift stores if you’re wanting to save some money.
The tricky part would be installing them as they are larger than most pneumatic wheels. But hey, when there’s a will there’s a way!

Lawn Mower Tires
The type of lawnmower wheel pictured above is easy to find at hardware stores, thrift stores, garage sales, or online. Simple and easy to install, and no airing up!
More on types of wheels that can be used for chicken coops or tractors can be found in this article
Size Of Wheels
As for the correct size of wheel to use, it’s important not to pick too small of a wheel or the weight of the coop will not allow it to move freely.
If you have small coop, a smaller wheel will work just fine. As a general rule of thumb, we suggest a wheel at least six inches or larger.
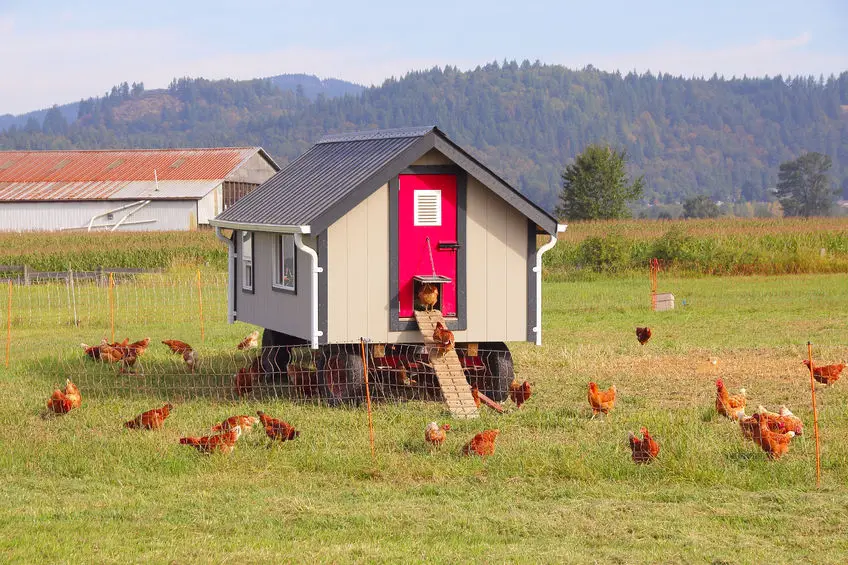
For a large coop, a larger wheel size will be needed. Large chicken tractors, the kind that are pulled by a tractor, use car tires or similar size! See picture below. But for the average small coop, anything from 6 to 12 inches in diameter should work nicely.
Tips And Tidbits
For this article, we are talking about attaching a wheel to a smaller sized coop vs the larger, heaver models.
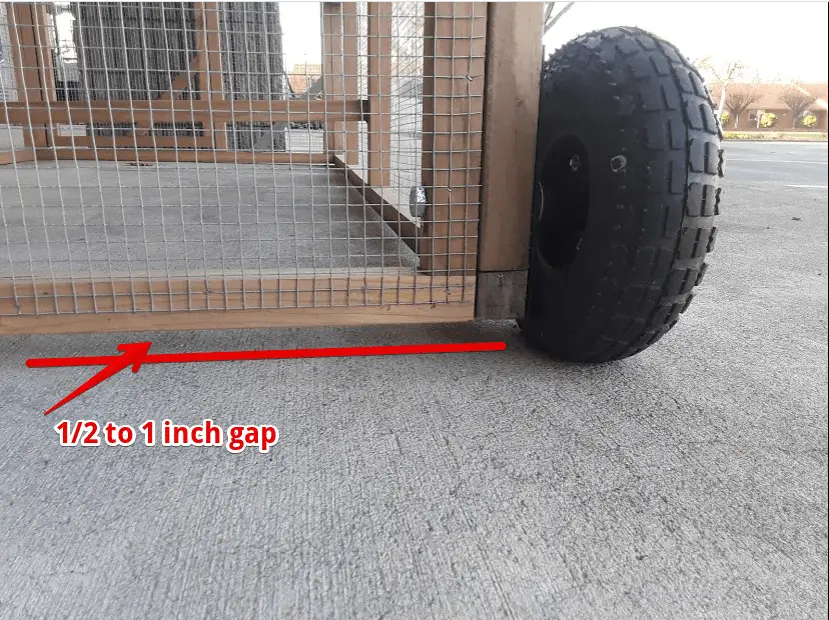
When completed the coop will set around 1/2 to 1 inch off the ground on the run end of your coop/run.
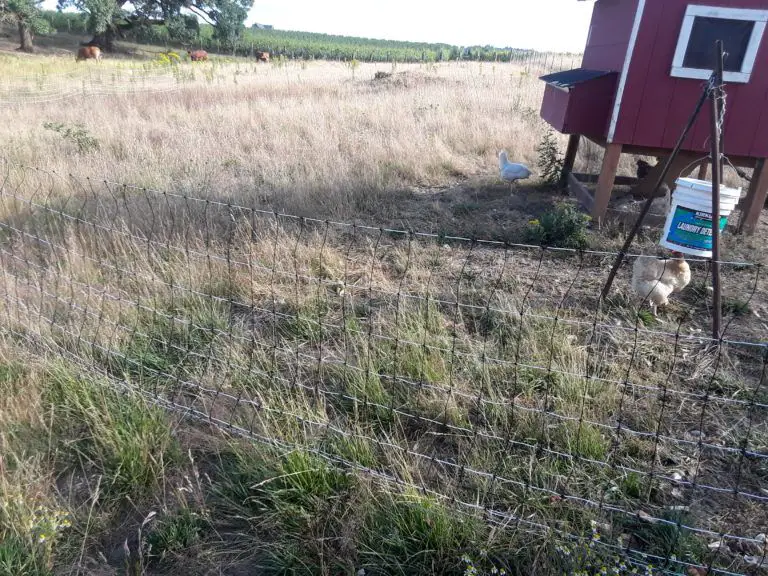
A WORD OF CAUTION: If you have a lot of issues with predators trying to break into your coop or run, you may need to consider a different set up. Since the coop is elevated slightly, it leaves an opening (ableit a narrow one) for any would-be predator to try and get in.
Although it’s only elevated an inch or less, it could provide enough of an opening to reach a paw in or lift the coop high enough to crawl in. It may not be the most likely scenario but some predators are very clever!
Some mobile coops have wheels or axles that can be adjusted up or down. This is great because the run lays flat on the ground when stationary but can be moved up when wanting to move it. An example of this type of mobile coop is the Eglu Cube.
For our purposes today, we are just covering one of the SIMPLEST ways of adding wheels to a mobile coop/run.
OTHER CONSIDERATIONS
For this post, we’ll assume the bolt size is a standard 5/8 bolt but it can vary in diameter depending on the size of the bore of the wheels chosen for your run.
If you’re using a lawn mower wheel, you can buy shoulder bolts (see pic below). These are great but will cost a bit more than a standard bolt. However, they’re a wonderful option for this type of wheel.

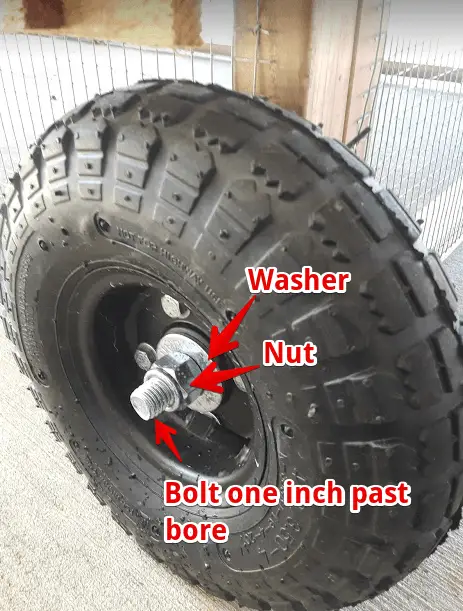
The bolts need to match the size of the bore, or center hole in the metal or plastic hub. See photo below. Measure with a tape measure and head to the hardware store to get the correct size bolts, washers, and nuts. Or simply take a wheel to the store to find the best fit.
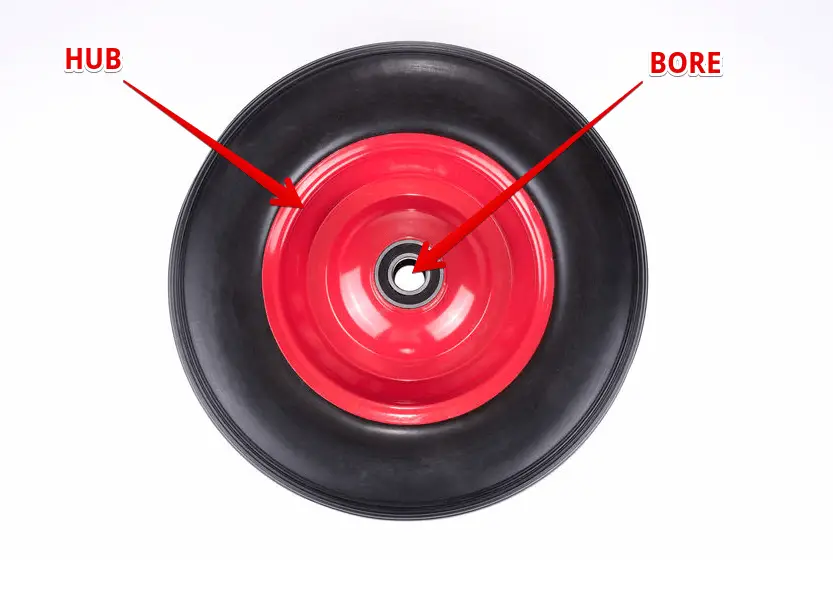
Note: Bores may have bushings or bearings in them, depending on the type of wheel. Since a mobile coop will not be moved very far, it’s not crucial to have a wheel with these components as there isn’t a lot of ‘wear and tear’ on the wheel set up. As long as the axle fits through it and the wheel spins freely, it should work nicely.
For more information on lawnmower wheels, see this article.
Materials and Tools List
The following materials are needed:
- Two wheels of your choice.
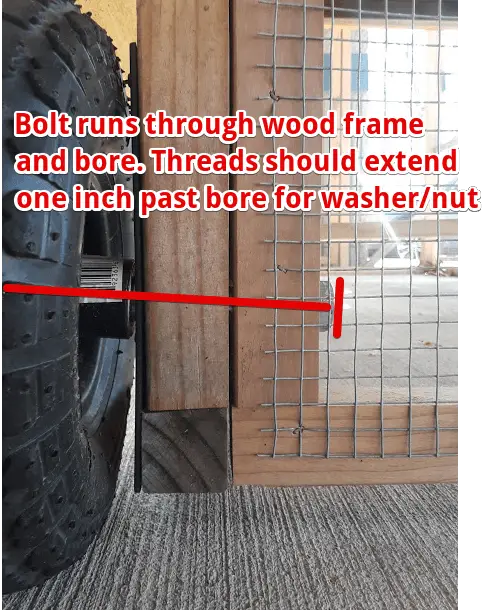
- Two 5/8 inch bolts. The length should be around one inch longer than the distance through the frame and bore (around 8 inches +-); Again, the bolts used simply need to match the bore of your chosen wheel.
- Four 5/8 inch washers (2 for each side) ; Washers should match the bolt size.
- Two 5/8 nuts (one for each side) ; Nuts should match bolt size.
Tools:
- Drill
- Drill bit (for wood) to match size of bore. A smidge larger than the bore is ok, but not smaller since you don’t want to be pounding it through the hole, which can damage the threads of the bolt or split the wood frame piece.
- Wrench to tighten bolts. If you don’t have a tool set, a crescent wrench will work fine (see pic below)

*Refer to the pictures for a frame of reference while following the directions*
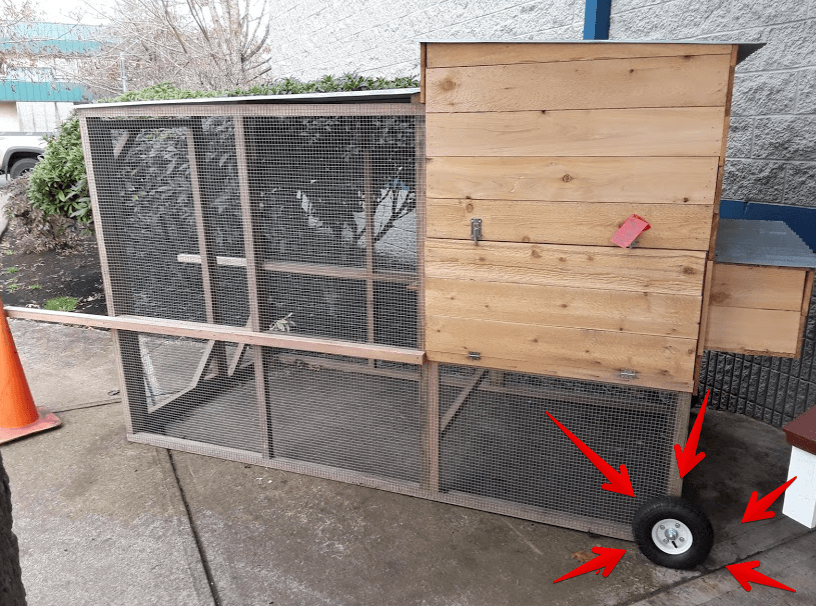
- Start by putting the coop/run on a flat surface. Then elevate the run end of the coop 1/2 to 1 inch off the ground with a piece or two of scrap wood. A left over 3/4 inch piece of scrap wood should work nicely.
2. Once propped up, set the wheel against the lower outside corner frame where you want to place the wheel. Since the coop is propped up, the wheel will already be at the correct height.
3. Take a pencil, slide it into the bore and make a mark on the frame.
4. Pull the wheel away and measure the center of the frame with a tape measure or carpenter square and mark it.
5. Then place your drill bit on the mark and begin drilling until you’re all the way through.
For estimating size of bit needed, HomeAdvisor figures 1/64 larger than the bolt size. When we drill, we first try a bit that matches the bolt size exactly. If it’s too tight of a fit, we try the next bit size up.
The standard length of drill bits is usually 4 1/2 inches long, which should be long enough if drilling through two 2×2 framing boards. If you are using thicker lumber, you can find (or buy) bits that are several inches long.
CAUTION: Be careful not to let the bit scrape against the inside of the bore too much since you don’t want to damage the hub or your bit!
Now you’re ready to bolt the wheel on!
6. Line the wheel up to the hole in the frame, put a washer on the bolt and slide the bolt through. Put the other washer on the threaded end and screw the nut on. Bolt should be an inch or so longer than the end of the bore, as in photo.
The threaded part of the bolt can be on the inside or outside the coop, whatever your preference. Many prefer the threads on the outside since they’re easier to access if they need tightening.
7. Tighten with a wrench.
With this set up if you tighten it too much, the wheel can bind and not spin very well. Simply tighten the nut a little bit tighter than you can do with your hand. Check to make sure the wheel can spin, but doesn’t have too much play.
Below is a video showing how a wheel is installed on a push mower to give you an idea.
8. Repeat the process with the other wheel.
9. Attach the handles on the sides of coop opposite the wheels, and you’re all set!
Note: The axle bolts may need occasional re-tightening from time to time.
That’s it. You just added wheels to your coop!
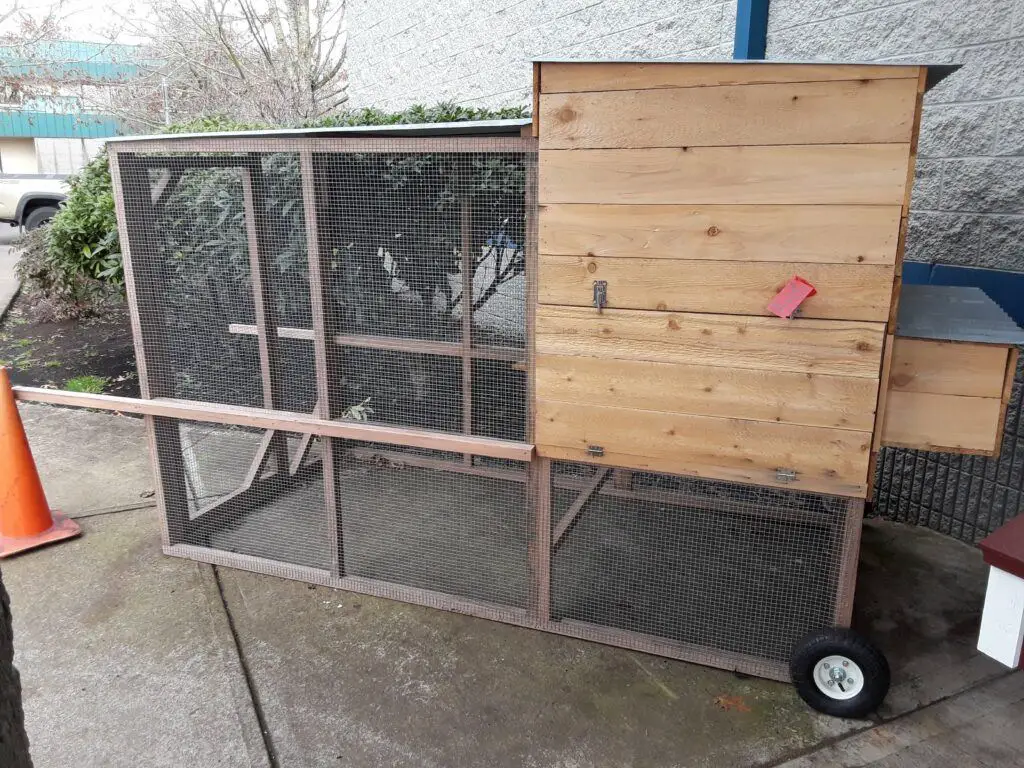
Here’s what it will look like with handles installed:
Final Thoughts
We hope you found this tutorial helpful. As you can see, it’s not the most compicated task to take on.
This simple way of attaching wheels to a run or coop is not recommended for heavier coops because the wheels would bind. But for smaller coops made of lighter building materials, it can work great.
Thanks for stopping by and we wish you all the best in your chicken raising adventures! Happy Chickening.


This article is perfect for farmers. my dad is actually thinking of starting a farm very soon so I will be sure to share this article with him. I am sure that he was not aware of this. I believe that it will make life easier for him. Thank you so much for this wonderful post.
Hello Daniel and thanks for your comment! We love helping folks so glad this article will do just that.
I guess the only thing I would worry about would be something digging underneath
Hello Ed and thanks for your comment! Yes that is an issue with mobile run. It’s easy to predator proof a stationary run by placing large rocks around the perimeter but that will not work with a mobile coop/run. It may work to staple/nail a piece of hardware cloth about a foot wide around the perimeter of the base of the run, all the way around it. If it’s attached to the base framing (that sits on the ground) it can move with the coop/run each time the coop/run is moved. Hope this makes sense. For additional predator proofing ideas, 15 Common Chicken Predators And How To Keep Them Out Of Your Coop Hope this helps!
Stumbled upon this article . Thanks for your I need to make it easy for my daughters to move the coop.
Hello Phil – thanks for stopping by! Glad it was useful for you.
Oh my god such a lovely article, your writing reminds me of my childhood. When I was in the village unfortunately we didn’t have facilities like these days and I always have problems with our chickens. I hope everyone reads this article, especially those who are living in the village. Thank you so much
Thanks for stopping by our site Liam! We appreciate it.