
If you’re looking for a solid, basic plan for a long lasting coop, we’ve got you covered. The design we’re talking about is featured below. It’s a free 4×8 chicken coop plan, capable of holding 8 – 12 chickens (or more). It’s made of wood and the roofing material of your choice.
We bought this plan to share with out readers but have not made it ourselves. After looking it over, it looks solid but we added a few tips/ideas on potential improvements or modifications below the plan.
Why 8 – 12 Chickens?
We believe this design can house 8 – 12 chickens. Why? Because we’ve built a similarly designed 4ft by 8ft coop in the past and it worked very well.
However, the reason why it worked was because our birds were either free ranging or were in a large run. So they slept in the coop at night, laid eggs in the nest boxes during the day, but spent the vast majority of time outside.
If we did not have a large run for them and they were kept solely in the coop, we would have stopped at a total of 7 or 8.
Opinions on this vary, some people saying a coop this size can hold up to 20! We thinks that’s pushing it, and there would be crowding issues, greater likelihood of illnesses, cannibalism, and more.
Building A Chicken Coop Is Scary!
If building a chicken coop scares you, you’re not alone. Many of us are simply wanting a nice coop for the backyard and there are an overwhelming number of options to choose from online.
That’s why a detailed plan can help alleviate some of that anxiety; And a FREE plan helps lessen than anxiety even more!
Building supplies can add up, so if you like this free plan, you’ve already save some money!
We have a small hobby farm with a few chickens, cows, and a garden. So don’t get the impression we’re professionals that know everything – we don’t. However, we’ve learned a lot over the past 15 years of raising chickens and have built or bought several different chicken coops. Our entire site is about sharing this knowledge with others, which is a lot of fun!
Having said that, if you’re wanting more professional advice on building a chicken coop, consult a contractor. We aren’t carpenters. And if you’re wanting more advanced knowledge of raising chickens, talk to the pros at your local farm store.
Whether you’re new to chickens and chicken coops or not, read our comprehensive guide to getting started on the right foot.
Disclaimer – We are not carpenters or drafters. The plan is to be used as a model for building a coop, but it’s not perfect. We discuss some improvements/revisions etc. below it. So we want you to know it’s not perfect as is, and some tweaking will have to happen along the way.
However, we hope that, at a minimum, it gives you a great framework on how to build your own chicken coop!
Tools Needed:
Circular Saw (you could make all your cuts for entire coop with this)
Hammer
Drill
Helpful Tools if you have them: Table Saw (for ripping boards), Chop or Miter Saw (for quickly cutting 2×4’s)
Hardware:
8 sheets of pressure treated plywood (1/2 inch or 3/4 inch)
40 (forty) 2x4x8 framing lumber (estimate)
5 (five) 2x6x8 framing lumber (for flooring joists – can use 2x4x8 if desired)
4 (four) 1x4x8 or 1x6x8 fascia boards (attach to front, back, and sides of roof framing)
2 (two) 4x4x8 pressure treated
3 inch (or 3 1/2) deck screws (or 16d nails)
1 1/2 inch screws (or nails) for attaching plywood to framing
Eight 5/16 bolts/nuts/washers 8 inches long (for attaching stilts – 2 bolts per stilt)
4 hinges (2 for the nest box, 2 for the coop door)
Door Handle of your choosing
Roofing materials – choose either metal roofing or asphalt shingles or roll roofing (least expensive)
Caulking (outdoor) for the seams, window.
Optional but recommended – 8 (eight) 1x4x8 trim boards for the 4 corners (primed or stained)
Primer, paint, or stain of your choice.
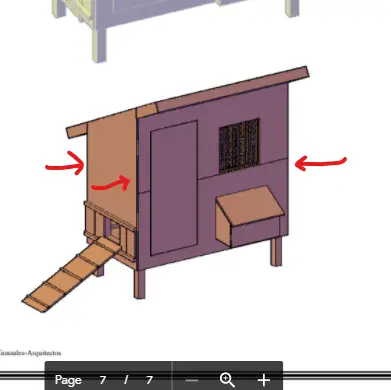
Okay – here’s the plan: (hover over PDF and you’ll see scroll option on bottom)
Revisions and/or Additions for this Plan
Although the plan is comprehensive, there are a few details and suggestions we wanted to add.
They include the nest boxes, window ideas, roof, stilts, roost, sliding doors (pop door), Z flashing, hinges, door, ladder, door handle, and trim (optional).
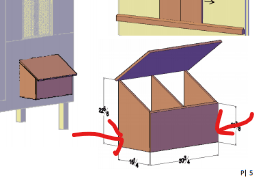
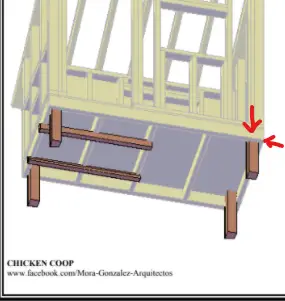
Nest Boxes:
A bottom will have to be screwed or nailed onto the underside of the nest boxes. Dimensions are 15 1/4 inches X 30 3/4 inches.
You can attach the nest boxes using two 15 inch pieces of scrap wood (2×4, 1×4, or whatever you have around).
Place the end of the boards perpendicular and flush with the 2×4 framing and screw in place into the bottom two corners of the nest box opening.
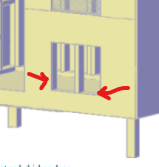
Then place the nest box into the cut out and screw the box onto the newly added 15 inch boards from the outside of the nest box on both sides.
Below is a picture of what the supports look like in the coop I’m building.
Window Ideas
For the window, you can leave it open and covered with a square of hardware cloth (either 1/4 or 1/2 inch squares). Obviously the wind, rain, and snow can blow inside at times but can also provide great ventilation. But chickens are hardy and can tolerate the weather quite well.
If you choose this method, try to position it so the prevailing winds are on the opposite side of the window to minimize the amount of rain, snow, etc. that can get in. It’s also smart to prime or paint the floor of your coop to protect against the elements.
Another idea you could try is to use plexiglass over the opening. It allows light to enter the coop but doesn’t require changing the window opening since plexiglass is made of a plastic type material and can be cut to size.
This option does not allow for ventilation as it’s a fixed window, so make sure you add venting in other areas of you choose plexiglass.
Install A Window
If you don’t like the idea of using hardware cloth or plexiglass, consider installing a window. If you go with this option, you can custom order one from your local home store to match the window opening in the plan.
This will add to the price of the coop, but will look great once it’s in! You’ll also be able to get the style of window you want. The different types of windows are described here.
If you’re wanting to save a few bucks, consider looking on Craigslist, Offer up etc.. There are lots of great options here (used or new) that can easily be used for your coop!
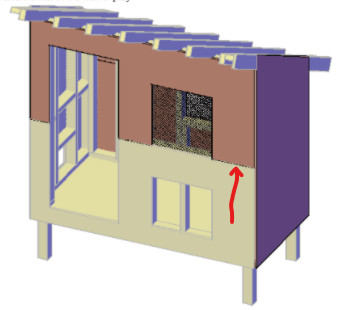
Below is a used FREE window we found on Craigslist. We incorporated it into the design of the coop we are currently building. *this coop is not the same as in the featured plan.
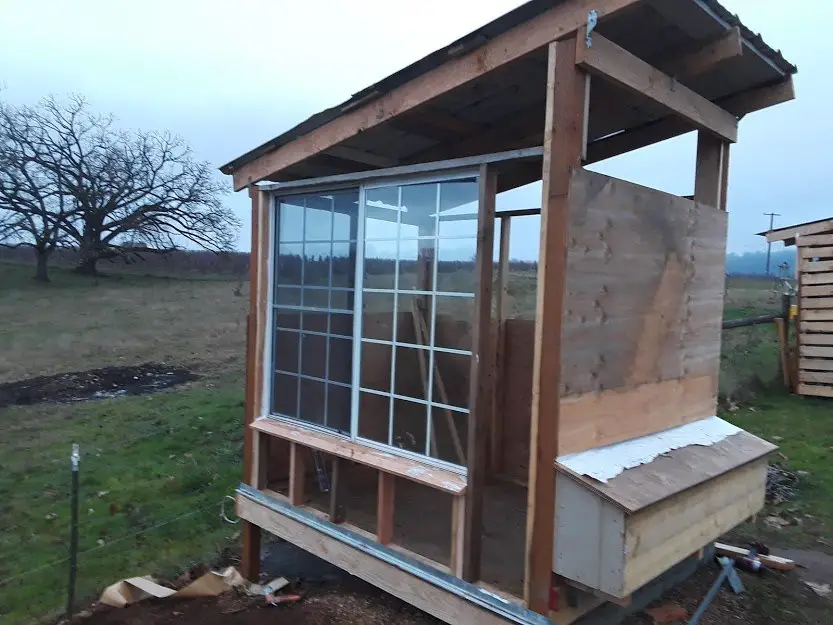
To install window in your coop, you can adjust the rough opening size to accommodate the dimensions of the window. This can be extra work, but will allow you the flexibility to use just about any size or style of window you like!
Windows are great in that they not only allow for added light, but you can leave the windows open in the summer to keep the coop cool, and leave it shut in the winter when it’s cold.
Make sure you get one with a screen or, if it doesn’t come with one, add some hardware cloth over the opening to keep outside birds/predators out.
Door Ideas
This coop comes with a door plan but if you’re looking for other ideas, we found three great door ideas at Mother Earth News, with tutorial included.
Door Handle – You get to be creative here since just about anything can work as a door handle! You may not need one for the nest box since you can simply lift up from the front lip of the lid.
Roof Ideas
This Coop design does not show a finished roof. You’ll have to add whatever roofing material you like, depending on your preference, budget, etc.
We suggest using metal roofing. You’ll get a roof that will last a very long time. It costs more than other types of roofing like asphalt shingles, or rolled roofing, but is very durable. We discuss the different types of roofing that can be used in this article.
The roof plywood and studs shown in the plan will make a solid surface to install the roofing material of your choice.
Roost
A simple 2×2 wooden roost can be positioned wherever it suits you best. Either nail or screw it into the framing. We like a long roost to accommodate more chickens.
More space per chicken on the roost will help prevent crowding issues and allow you to expand your flock without adding more roost space later.
Read our article on roosts for more information.
Stilts
For the 4×4 corner stilts, go with cedar or pressure treated lumber as it will fare better being placed on or in the ground.
You can make the stilts any height that suits you. In fact, if you don’t want them at all, that’s fine too. An issue with not having it elevated is that mice, rats or other critters may dig their way under the coop to make a home of their own, yikes!
Not only that, having it elevated makes it more difficult for predators to gain access to your flock.
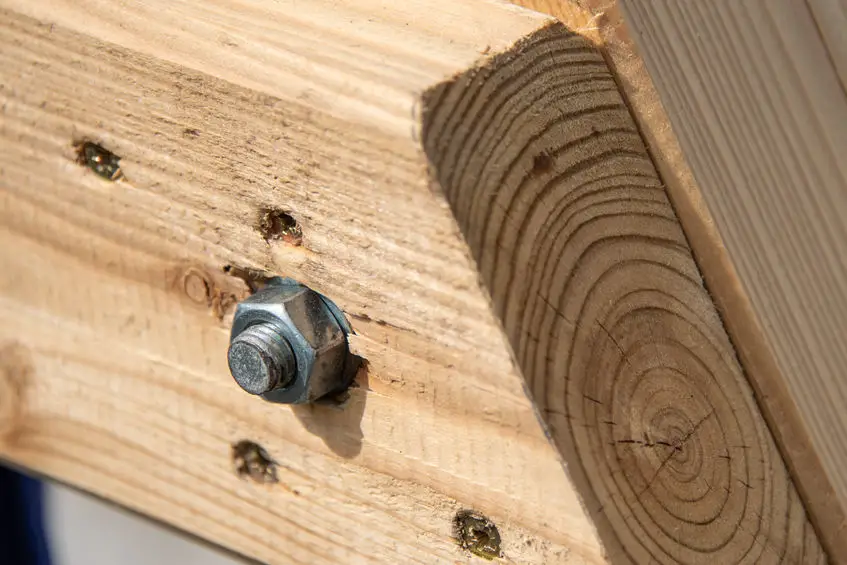
A suggested height for the stilts would be 2 to 3 ft off the ground, and these should be bolted to the outside corners with two 5/16 inch nut, washer, and bolt per stilt. Bolts should be at least 8 inches long.
Consider burying your stilts 2-3 feet in the ground in concrete if you’re worried about it blowing over. If you go this route, make the stilts 5-6 ft long to account for this.
Dig the holes first with a post hole digger or shovel, add a few inches of pre-mixed concrete in the hole and put your posts in, making sure they’re level. Once the concrete is dry, fill in the hole with the remaining dirt, and build your coop on the stilts. Here’s a video showing how it’s done.
Stairs
Stairs can be built and added to the coop if you wish or, depending on the height of your stilts, you may be able to use a makeshift stair out of a cinder block, a large log on end, or similar. It depends on the look you’re going for, and how much money you want to spend.
Home Depot and Lowes sell premade stair cut outs which may work nicely for this! Or you can make your own. Here’s an article showing how it’s done.
Sliding Door(s) For Chickens
The plan has 2 sliding doors pictured, which is fine. But you can easily get by with one sliding door to save some time, if desired.
Also, it’d be wise to use cedar or some type of pressure treated rails as it’s a water catch. Adding a bead of caulking over it would help prevent water from getting behind it, causing rot.
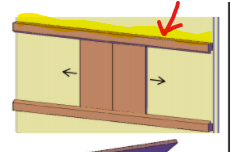
Adding Siding or Z Flashing
If you made the coop of exterior grade plywood, you can simply paint it and it’s good to go. However, the space between the plywood sheet can catch water, leading to leaking in the coop and damaging the materials.
To prevent this, consider adding a strip of metal Z Flashing which is found in the roofing area of Home Depot or Lowes and is usually quite affordable.

Another idea is to add siding over the plywood, like shiplap or similar. This would eliminate the need for Z flashing since the siding is installed right over the plywood. It also looks great and will last a long time! Of course the drawback is the added expense. The coop will work perfectly fine with or without siding.
If you decide to nail siding over the plywood, you won’t need to buy the pressure treated type since it won’t be exposed to the elements, which will save some money!
Hinges
Hinges will need to be added for the large entrance door, and nest box lid. We suggest buying something a bit larger as there is less chance of it coming loose.

Strap hinges are durable, work very well, and look great. Two hinges per door for a total of 4. Smaller hinges can be used for the nest box lid, but it’d be a good idea to get larger hinges for the entrance door for added stability and to accommodate the added weight. They are available at hardware stores or online.
Ladder
The chicken ladder can be made however you want it! Lots of room for creativity here. Having the spaced steps on a left-over piece of plywood will work just fine.
Over time, the plywood may bend a little, so you can consider using two or three 2x4x4s butted next to each other with the stairs nailed over top, and spaced about 6 to 8 inches apart.
Stairs – These can be any scrap of wood about 1 inch thick and as wide as the ramp it sits on top of. Twigs laying in the yard can work too – a free, artistic touch! (although a bit hard to nail into the ramp).
Trim (optional)
The trim can be added to the corners for aesthetics, and it can also keep water and other elements from damaging the corners of the coop.
1x4x8 trim boards will work great. You can buy them already primed, or you can do that yourself before painting. If you want to use stain instead, that will work great too! Nail the boards in with 2 1/2 inch nails or similar.
How To Save Money On Building Supplies
If you’ve got the money for new building supplies, that’s great. Home Depot, Lowes, or other building supply stores will have all the materials you’ll need to make a gorgeous coop.
But if you’re looking to save some money on building supplies, consider using re-purposed materials if you have them in your area.
Find Re-purposed or Used Building Materials
What we’re talking about here are businesses that sell used or new materials that were donated or didn’t sell elsewhere.
The advantage of these businesses is they sell lumber and other supplies like hinges, nails, screws etc. at a discounted price. These stores can usually be found using a simple google search. We were able to do this with our coop and saved a lot of money!
The disadvantage can be selection. They don’t always get a consistent supply of the same materials. For example, you may go one week and they have a large amount of framing lumber and plywood. By the next week, it may all be gone and they have a wide selection of flooring boards instead. From week to week, supplies can vary.
Having said that, it’s well worth your time to check into this option! We did, and it saved us a bundle.
Which Type Of Wood To Use
There are many species of wood available to use. Douglas Fir, Redwood, Cedar, Maple, Oak, etc. And then there’s pressure treated (for outdoor use) and non-pressure treated lumber – it can make your head spin!
Generally speaking, for framing you can use non-pressure treated Douglas fir boards since they are covered by plywood. For this 4x8ft chicken coop plan, you can get by with 2x4x8 ft framing lumber for the sides and top, and 2x6x8 boards for the flooring joists. *If you don’t plan to walk around in it, you could also use 2x4x8 for the flooring joists as well.
Any wood exposed to the elements should be rated for outdoor use. So the outer sides of the coop should be exterior grade pressure pressure treated plywood, T-111, or similar. Having said this – we have used indoor grade plywood and painted it with a couple coats of paint, and it’s fared well – but know you simply won’t get the longevity like when using pressure treated materials.
The exterior grade plywood is more expensive but can be worth it in savings in the long run as it will last longer with less maintenance.
Closing Thoughts
We hope this free plan will work great for you or, at a minimum, provide some design ideas of your own!
Building a coop takes a lot of time and effort and expense but is so satisfying once it all comes together. We wish you all the best in your coop building adventures!
Happy chickening.