
This plan is a nicely detailed free 4×8 chicken coop plan. It offers a gable roof design and is very solid!
It’s also shorter, setting only 4 ft high at the roofline. However, if you’re planning make this coop mobile (which it can be), the lower height will use less materials, thus reducing the weight.
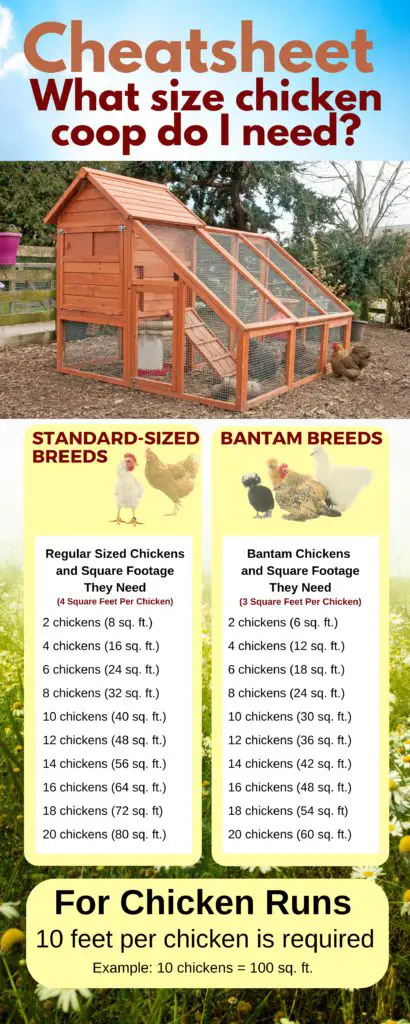
The coop plan is designed to house up to 16 chickens IF you’re planning to free range them. A more comfy ratio 4 any 4×8 chicken house plan is 4 sf per bird, which would total 8 chickens in this coop.
Here’s the breakdown of space requirements: 4sf x 8sf = 32sf total. 4sf per chicken/32 = 8 chickens; 3sf per chicken/32 = about 11 chickens; and 2sf per chicken/32 = 16 chickens.
If you are planning to house your flock without a run, or a small run attached, aim for the 4sft per chicken mark. Your flock will thank you for any added space that can be given!
See the below chart on coop size requirements.
.
Next let’s head over to the plan! If it doesn’t seem to be the right size or style you’re looking for see our large selection of DIY chicken coop plans, all of which are FREE!
Ideas For Revisions (all optional)
This is one of the better designed and detailed plans that we own. There is really very little that actually NEEDS to be done on this coop design. But sometimes as we review plans, we’ll see opportunities for modifying it.
These modifications may or may not be helpful for you. At the very least, it can get you thinking about how to use or modify this coop to suit your needs!
Disclaimer: Please remember we are not architects or carpenters. The ideas presented are just a few thoughts that came to mind when examining this plan. Consult a real carpenter or architect if you want professional advice. We are fellow chicken lovers who love to geek out about raising chickens and building chicken coops!
Framing Lumber Size
The coop design should be framed with 2×4 lumber. Consider using 2×6 lumber for the skids (the three long boards under the sheet of plywood). This will be adequate and make for a very solid coop.
For the purlins (the boards the metal roof attaches to), it’s suggested to use 2×3 boards. However a 1×4 or 1×6 could work here as well. Having said that, you’ll have a more solid roof if you go with the 2×3 or even 2×4 purlins.
Siding
The siding shows plywood attached to the 2×4 framing. Use plywood that’s designed for handling the elements. Avoid OSB as it’s only made for indoor use.
It’s also smart to paint the exterior of the coop for added durability. Not only that, it’ll look awesome with a sweet paint job!
Some flock owners even add a name to the outside of the coop, or landscape it by adding plants around the perimeter. These are just ideas, but it’s fun to get the creative juices flowing when building a coop.
To learn how to attach siding to the coop, see this tutorial.
Nest Box
The nest box can be framed with either 2×4 or 2×2 lumber since it will not have to support a lot of weight.
Also, one or two dividers can be added in the nest box if desired. If using one divider, it can be positioned at the halfway mark, which is 16 inches here. If using two, they can be placed at the 12 and 24 inch mark.
When we built our coop this year, we added 2 nest boxes which were positioned 12 inches x 12 inches. Then we left a larger section of 4 ft by 12 inches without dividers. We have found the chickens use them all, leaving us to wonder if the dividers are really necessary.
I guess, like people, some chickens may value their privacy while others don’t mind hanging out with other members of the flock to lay the daily egg?.
What we’ve noticed is that you can have several nest boxes and they all seem to crowd into one or two to do their laying, so having several nest boxes for each chicken may not be necessary after all. You’ll have to make the decision on what will work best for you and your chickens!
Make It Mobile?
The design shows three 2×6 skids under the coop. This can make the coop mobile. You’ll just need to attach a rope to the outside two skids and you’re ready to move!
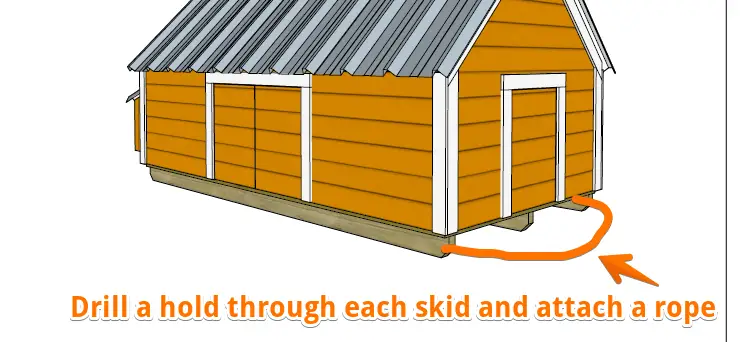
The coop will still be heavy, but because the side walls are only 2 ft high (vs 6 ft high like in many other designs), the weight will be less and it is still moveable.
If you plan to move it a lot, consider adding wheels to it.
Roof Materials
The roof and nest box lid show metal roofing, our personal favorite. However, if you have some shingles laying around or find a few cheap bundles at a nearby big box store or repurposed building materials store, feel free to use them!
Roll roofing, asphalt shingles, cedar shakes, are all good options. We like metal since once it’s installed, you’ll have a maintenance free roof for a long long time.
Again, it’s a matter of personal preference.
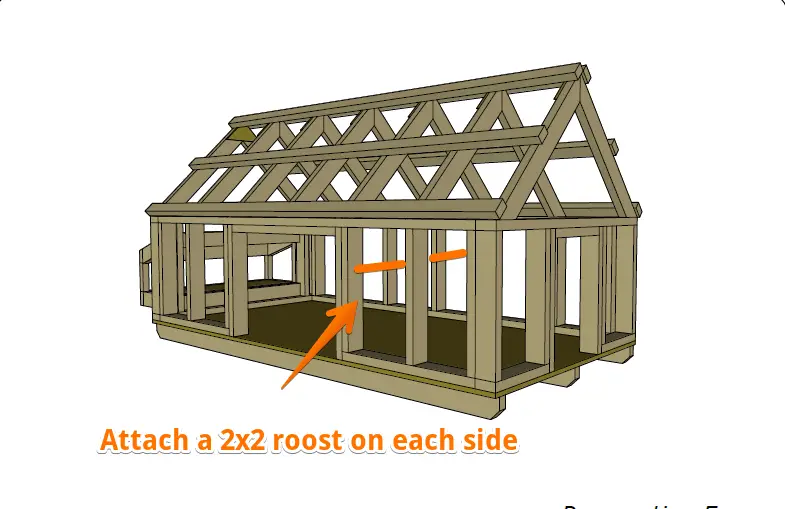
Adding Roosts
Roosts can be made of just about anything wooden. But if you’re looking for a simple roost that can be attached between the two walls, consider screwing a 2×2 from one side to another.
Ventilation Idea
The plan shows a great section for ventilation, but does not show that it’s covered with anything. Consider tacking on a small strip of hardware cloth or chicken wire over this opening (from the inside preferably so the stapled area is inside the coop vs. the outside where people can see it.
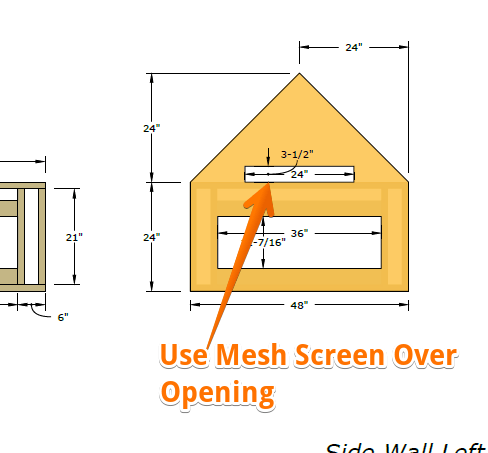
Hardware cloth is easy to find at your local hardware store, or home store like Lowes, Home Depot, Menards, Runnings, etc. If you’re lucky, you may be able to find a strip or partial roll of hardware cloth at a local Habitat for Humanity or other businesses that sells repurposed building materials.
Flooring Thickness
The floor of the coop is 3/4 inch plywood. This is excellent thickness to use and will withstand just about anything the chickens throw at it!
Since the coop is shorter, chances are you won’t be spending a lot of time inside of it. If that’s the case, you can consider using 1/2 plywood for the floor. It’s plenty sturdy for just chickens (and people too). Plus it will make it lighter if you’re planning to make it mobile.
Custom Sizing
The plan shows a shorter coop, which can be very advantageous at times, especially if you’re wanting a solid coop that can still be mobile.
But if you want some standing room to walk inside and socialize with your flock, you can simply build the framing to accommodate this. No problem. Instead of using 2 foot framing on the sides, use 6 ft (or taller) wall framing instead. It’s that easy.
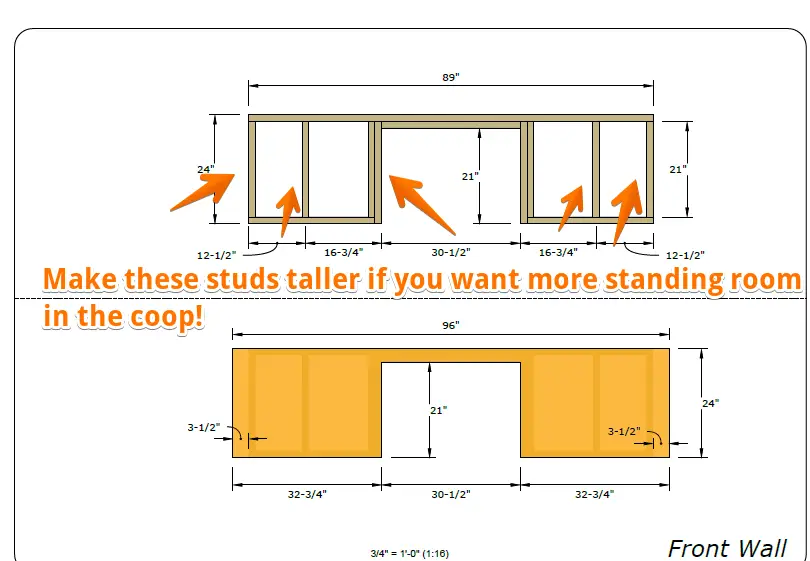
The rest of the coop will remain unchanged in terms of the roof, nest box area, etc. The outside door could be made larger for you, the human, if you plan to access the coop on a more regular basis and want to go through an opening without having to duck all the time.
Add A Run If You Don’t Want To Free Range Your Flock
The design does not show a run, but it would not be difficult to attach one over by the pop door, if desired. This keeps your chickens from roaming onto your porch or lawn, dropping their fecal presents just for you!
However, if you have the space or area to let them free range, they’ll be much happier. But even a run attached to the coop will provide them the chance to pick and scratch outside.
If you add a run, though, just know it’ll be harder to make the coop mobile.
Here is one flock owner’s idea on adding a run:
Final Thoughts
We hope you enjoy this plan! If you don’t think it’s for you, no worries! We have several other free plans to take a look at. You can find all of our free DIY chicken coop plans on this page.
Building a chicken coop is not the hardest structure to build. Yes it will take some work. But seeing the end result of your hard labor is totally worth it in the end!
When we see our flock frolicking around in the coop we made for them, it really brings up a great sense of pride. We hope you get the same ‘feels’ when building your coop!
Thanks for stopping by and good luck building your next chicken coop.