
This next plan is great for those wanting between 10 to 20 chickens. It’s steeply sloped roof helps shed the rain nicely, and it’s built on skids so it can be slid to your desired location. For ideas on setting your coop up from scratch, see this article.
The number of chickens you want in the coop can vary depending on whether you are free ranging the flock or have them in a run. If you’re planning to free range them, you can likely house 20 chicken in this coop since they will not be in it much except when roosting at night or grabbing some grub during the day.
Below is our chart for knowing how many chickens you can house based on square footage of the coop and chicken size:
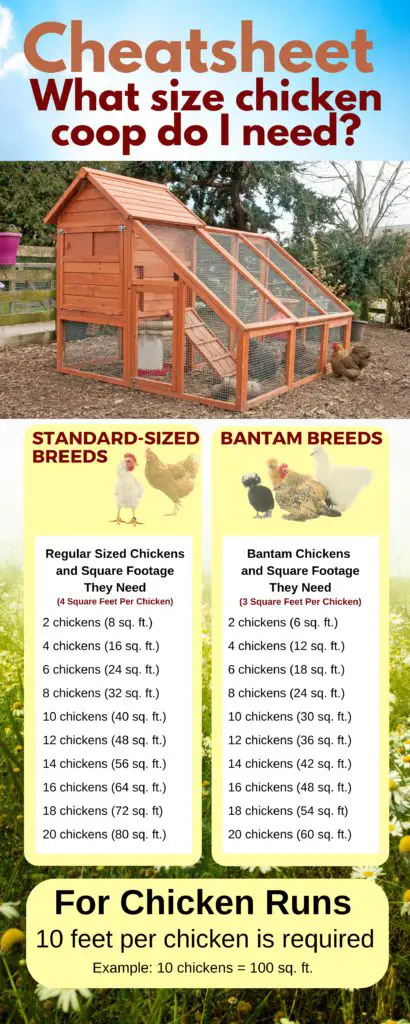
*Bear in mind that the above graph shows square footage per chicken in the coop if there is no run, or just a small run attached. If you are free ranging your chickens, two square feet per bird can work just fine since they’ll be out most of the day, using the coop for sleeping and eating. As a general rule, though, more is ALWAYS better when it comes to space. *
Here’s the printable, downloadable PDF of the plan.
Possible Customization Ideas
There are many customizations that can be done to this coop as well, which we’ll discuss next. We love this design because it’s very solid and not as difficult to build as other standard type coops with 4 walls.
Just know, whatever ideas we discuss are only a few thoughts we came up with when looking over the design. We are not carpenters, just fellow chicken and chicken coop enthusiasts like yourselves. So just keep that in mind when looking over our ideas.
Lumber Choice
The skids are made of 2×6 lumber. This makes the base very solid! It will hold together nicely. We thought by switching to 2×4 skids, it would lessen the weight some.
As for framing, it’s built with 2×4’s. Again, that’s ideal and makes it very solid. But you may be able to use 2×2 lumber for the two roofs, leaving the floor 2×4 for added stability.
These two ideas would lessen the overall weight of the coop but may also lessen its structural integrity. However, if you plan to place it on flat ground that’s not overly bumpy, you may be able to get by with those revisions just fine.
As for type of lumber, use something pressure treated or cedar for the skids. As for the framing, any type of framing lumber will be fine. Douglas Fir or pine are great options.
If you are using shingles for the roof, you’ll need plywood over the framed sides to tack it onto. Since the shingles are covering the plywood, standard OSB plywood (7/16″”) will work fine. It’s best to cover the plywood with felt paper before nailing on the shingles.
More on lumber types for chicken coops can be found here.
Roofing
For the roof, the asphalt shingles will look great and last a long time. They add more weight to the coop as well, however, which can make it harder to move around. Not impossible, it’s just heavier.
If you’re worried about the weight and are curious about alternatives, think about using a metal roof and ridgetop. It will last a long time and you can pick a variety of colors, depending on what your local home store or hardware store has in stock. You can also order it online.
Home Depot has a great tutorial on the different types of metal roofing and how to install it.
Front And Back Building Materials
The front and back side of the coop is built with 1/2 hardware cloth and stapled or nailed onto the framing. What’s great about this design is how much ventilation it allows. Plus, it will be lighter to move.
However, if you live in a cooler climate, you may not want that much air blowing through. Or, you just prefer the look of solid wood for the front/back instead. Plywood can be used instead of hardware cloth as long as adequate ventilation is added in both the front and back sides.
Again, adding plywood to the design can make it more difficult to slide around the yard or pasture. But if you like the look better, the trade-off may be worth it!
Flooring
The floor can be made of plywood as shown in the plan. It’s simple to install and will last a long time. It also provide some added warmth and insulation from the ground if you live in wet climate.
However, we have seen this style of coop with a hardware cloth floor as well. The framing, as it’s currently shown in the plan, provide ample surface area for nailing or stapling the hardware cloth on.
This option allows the droppings to fall through to the ground below, fertilizing the soil underneath. If you move your coop often enough, your entire backyard or pasture could be fertilized by your flock. Not only that, it means less cleaning for you!. Talk about a win win!
Yet another option for the floor is to simply not have one. The chickens can eat the grass and bugs in the “floor” or ground the coop rests on. This also allows the grass to be fertilized and gently “tilled” by your flock, which provides some measure of aeration for the soil.
If you choose the no floor method, the rest of the framing remains the same. You simply eliminate the flooring joists. This will lessen the weight of the coop significantly, and also make it cheaper and easier to build. More on coop flooring options can be found in this article.
Moving The Coop
This style of coop needs to be pulled by a rope attached to the front end of each of the skids. The rope can be attached to the skids directly by drilling a 1 to 1 1/2 inch hole in the front of the skids.
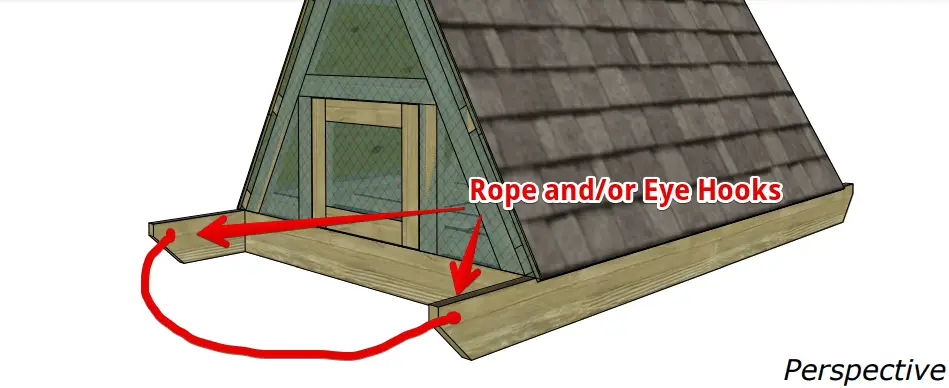
Or, you can install an eye bolt on each one and attach the rope to that. Use thick enough rope that will stand the test of time and the elements! Lots of great options can be found at your local hardware store.
Wheels
If you don’t like the idea of dragging your coop across the ground, or think that’s too clunky, we get it. If you plan to move the coop every day,, you don’t want it to be too laborious a process!
Enter wheels. Wheels, especially those that swivel, can make moving your coop much easier. It adds some work to the project but the end result may be worth it for the ease of moving your coop all over the yard.
Nest Boxes
Nest boxes aren’t shown in the plan. It’s not a major oversight by the architect, but they do need to be added if you’re building the coop for laying chickens.
Thankfully, nest boxes can be made out of just about anything big enough to comfortably hold a chicken. Five gallon bucket nest boxes would work great. Or you can stick with traditional next boxes and nail or screw them below the roosts or attaching them to the framing on the sides.
You could also tuck them just to the left or right of the door for easier egg collection! We write more on what can be used for nest boxes here.
Roosts
The roosts aren’t specifically pointed out in the drawings, so we’ll show you where the suggested roost placements are in the diagram below. More roosts can be added as needed. They can be placed wherever you think is best.
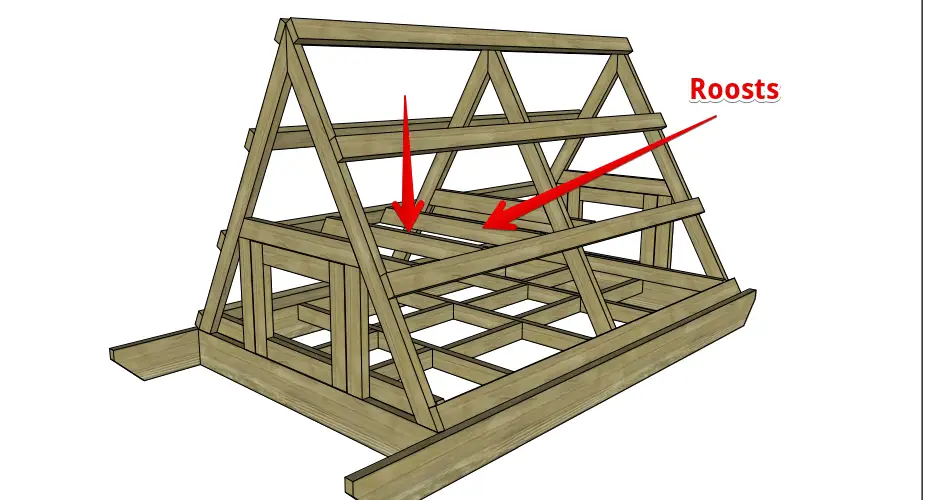
Roosts can be made of 2×2 or 2x4s as shown in the plan. We talk about many different types of roost ideas here. Each chicken should have around 10 inches of roost space. We noticed they often don’t use all that space since they tend to huddle up next to each other anyway.
The height is not very far off the floor so a ladder shouldn’t be needed. However, if you find they are having a difficult time getting onto the roosts at night, one can easily be added. See more about ladders here.
Back Door
The pop door in the front, where the chickens go in and out, is an appropriate sized entrance. The back door, however, is the same size. This is great for the chickens but for YOU as the owner, who will occasionally need to get in there, it might be a bit of a squeeze!
Consider altering the door framing to accommodate a larger door if you think you’ll need to get in there on a regular basis. That leaves one door for you, and one for the chickens.
Because many coops aren’t overly long (this one is 8 feet), getting inside the coop isn’t always necessary. You can reach in through the pop door with a shovel, rake, or broom to clean, get eggs, etc.
Again, this will come down to your own personal preference.
Custom Sizing
This coop is shown as around 5 1/2 ft (feet) by 8 ft. If you don’t want a coop that big or want to make it bigger, no big deal! Simply alter the dimensions to accommodate the number of chickens you’re planning to have.
Just keep in mind that once you get chickens, you’ll likely want to get a few more. It’s a common occurrence for many people who start raising chickens! They’re just so darn fun. Because of this phenomena, it never hurts to make the coop a little bigger than you think you’ll need ?
Closing Thoughts
We hope you enjoyed looking over this plan and some of the following thoughts that accompanied it. It’s a lovely design that’s user-friendly and will provide a strong yet cozy home for your flock.
Thanks for stopping by and good luck building your coop! ‘Happy Chickening.’
If this plan doesn’t quite work for you, no problem, check out a few of our other FREE plans.