This next plan does not include a lot of detail, like many of the other plans listed. However, it’s a great design, and there are just enough specifics to build it. It’s a free chicken coop plan for three chickens (large).
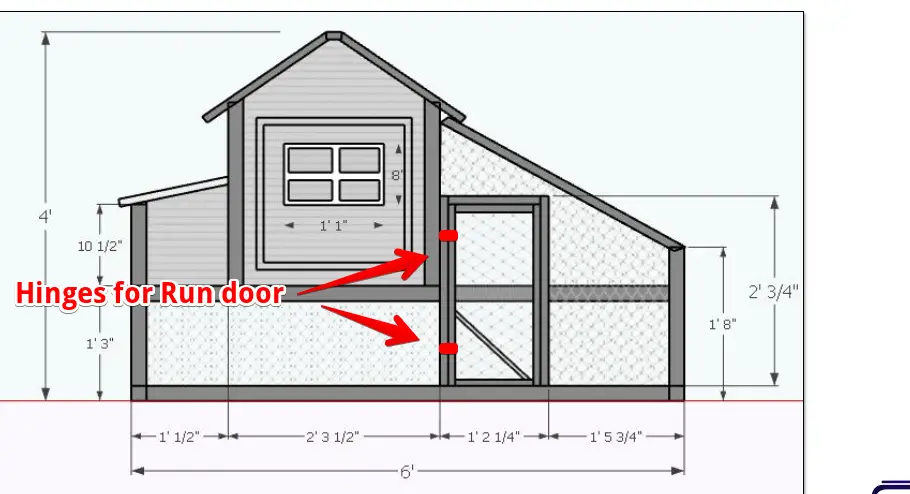
The dimensions are 4 feet (ft) wide by 4 ft high by 6ft long. The actual living quarters is large enough to hold 2 to maybe 4 chickens based on our calculations. Basically, the living space is 2ft x 4ft., totalling 8sf. It’s a nice cozy size for 2 or 3 medium to large chickens or 4 bantams.
The run on this coop is large, so your chickens will love that additional outdoor play space.
Here is the PDF downloadable plan. Again, there is not as much detail in this plan as we would have liked. Consider it more like a general guide but definitely not an exact blue print.
However, the basic design is great. And the good news…it’s free!
coop-from-ferrer-final-in-gray-4-chx
A Few Ideas When Building This Coop
When building this coop, you’ll have to figure out more of the specifics on your own. Obviously it shows the length, width, and height. But you’ll have to figure out how to build many of the other components of the coop without the specific dimensions included
To be honest, we are perfectly happy with a plan that doesn’t have each detail perfectly laid out. But we also know it can be very frustrating at times!
Below are a few ideas that may be helpful with this design. If you want a great resource on how to frame buildings, sheds, etc. see this site.
Roof
The roof material is not listed. We recommend either metal roof (the best options) or asphalt shingles.
Because it’s a smaller coop, you won’t need a lot of materials. Consider checking into local businesses that sell used or repurposed building materials. Sometimes you’ll find a few extra pieces of metal roofing or a partial roll of roll roofing, etc.
For information on building a simple roof, see this video.
Window
The window is very small. The added light and ventilation it provides can be helpful for your chickens, but you can get by without it too. If you go this route, be sure to add some ventilation holes near the top of the coop at the roofline.
An alternative would be a piece of plexiglass cut to the dimensions you want. Then add a few ventilation holes near the top of the coop at the roofline. We did this in our coop, and it works great!
Or, if you like the look and functionality of a window, you can find them at your local building supply stores or at businesses that sell repurposed building materials.
Building Materials
The coop can be framed with 2×2’s or 2×4’s. The sides and roof can be made of exterior grade plywood.
For the wire mesh in the run, 1/2 inch hardware cloth is sturdy and able to keep most common predators out!
Use nails or screws for attaching the plywood sides to the framing. We like using screws as it really makes for solid construction. However, nails work great and are more affordable.
Coop Door
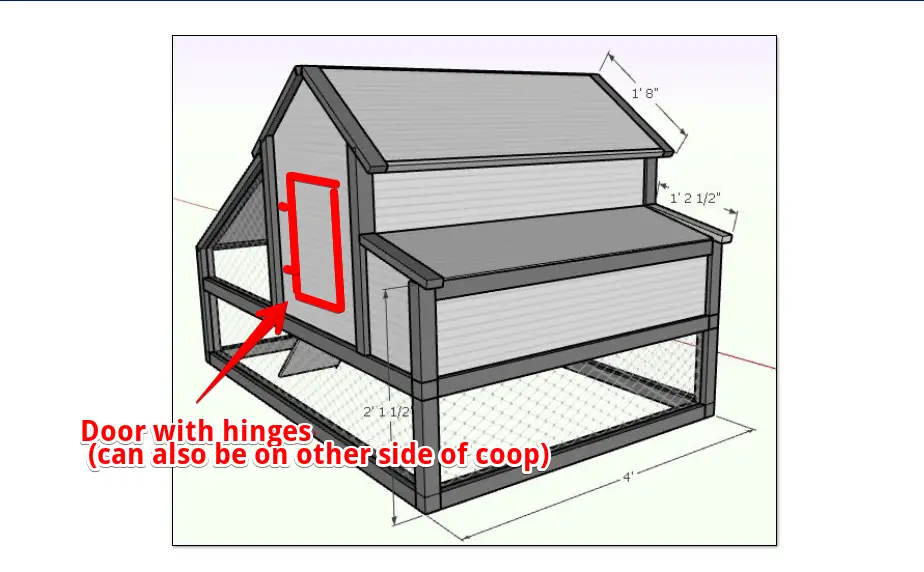
A coop door should be cut out as pictured below. You won’t have to make it huge, just large enough to get in for cleaning and gaining access to the chickens.
Below is an idea for door placement, but it can also be positioned on the other side of the coop.

Hinges
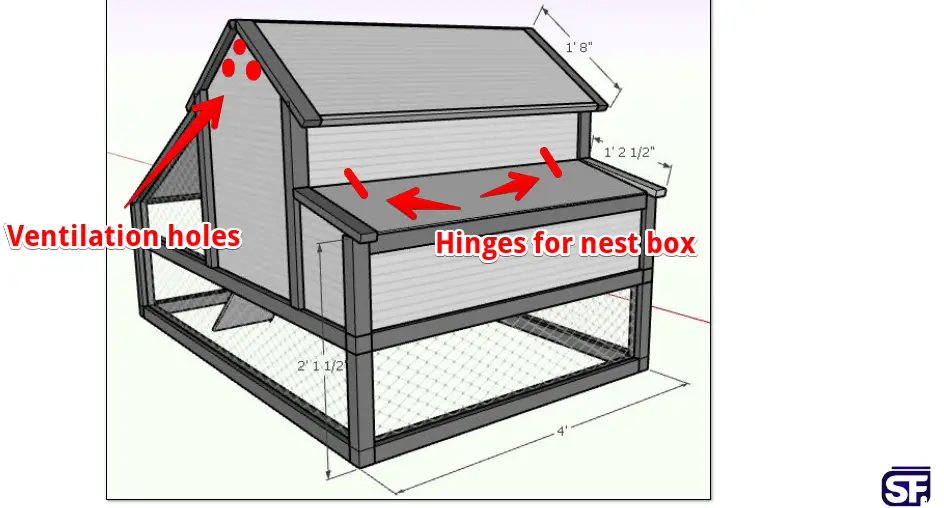
The outer lid of the nest boxes will need a hinge on both ends. We prefer strap hinges as they will hold up better to the daily use of opening and closing when gathering eggs!
However, if you have other hinges lying around or prefer a hinge with a different look, that’s fine. Just be sure to use hinges that will stand up to the elements.
Below image shows hinges placement as well as ideas for vent holes positioning.


Roost
A roost is not shown in the plan either. Thankfully, adding a roost is fairly simple to put in!
For two or three chickens, you can add it between two walls or wherever it will work best for your flock. Just make sure there is at least 6 inches of clearance from the wall.
A 2×2 works great. If the 2×2 has sharp edges, your chickens will thank you if you sand the corners a little. It’ll make it a bit easier on their feet. Other ideas for roosts can be found in this article.
We’ve also used 2×4 roosts, but installed them on end, meaning they roost on top of the 2 inch side of the board, not the 4 inch side.
Closing Thoughts
Although this coop plan lacks the usual details we like to include, it’s still a great design and will look great in the backyard.
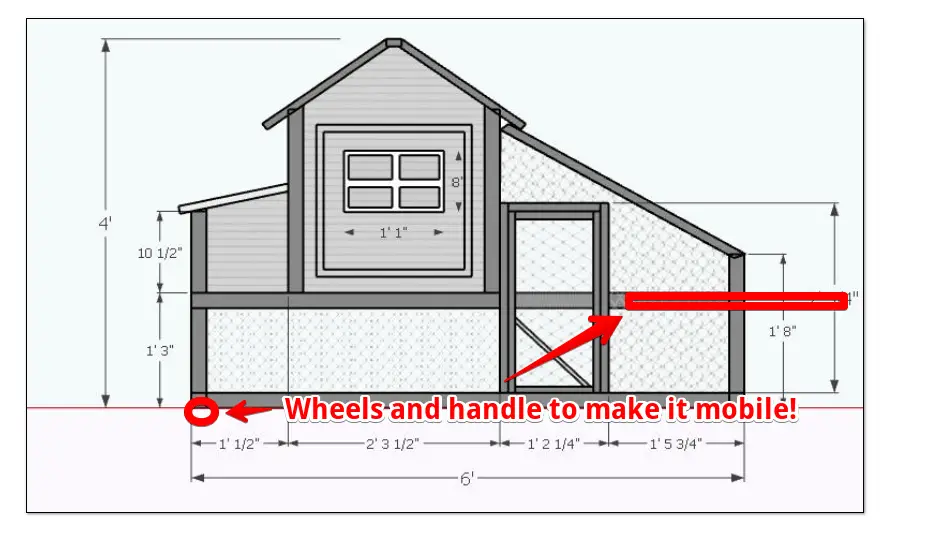
If you want to make it more “mobile-friendly,’ add wheels and a handle! See image below…

Either way, it’s a great coop design! If this plan doesn’t seem right for you, check out our many other designs until you find what you’re looking for. If you want tips on setting up your coop, see this guide.
Thanks for stopping by!
